Flash Injection Molding:Causes, Solutions & Prevention
2025-10-08 08:57:51
Flash injection molding happens when molten resin escapes the mold cavity under high pressure, which impacts cost, quality, and efficiency across industries. This minor defect indicates an imbalance. This article helps manufacturers, engineers, and decision-makers understand causes and solutions in tooling, material handling, and process optimization.
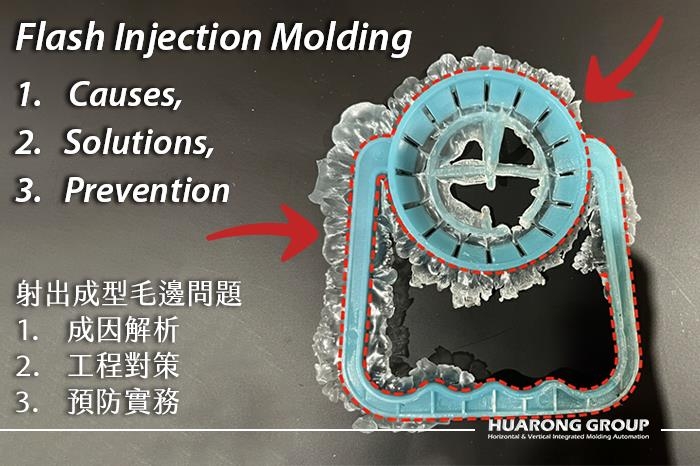
Flash is the excess plastic that seeps out of the mold cavity during the injection cycle. It usually appears along the parting line, ejector pin gap, slider, lifter, or sprue and gate area. The defect typically requires trimming or deflashing, and if left unchecked, can compromise product integrity, aesthetics, and functionality.

Flash increases scrap rates, slows cycle time due to deflashing, reduces dimensional accuracy, and creates weak points in parts. In automotive, medical, and electronics sectors where tight tolerances and flawless aesthetics are critical, flash is unacceptable.
To help you quickly understand flash injection molding, we've made a short video based on the mind map. It explains causes, risk factors, and solutions with a clear visual flow.
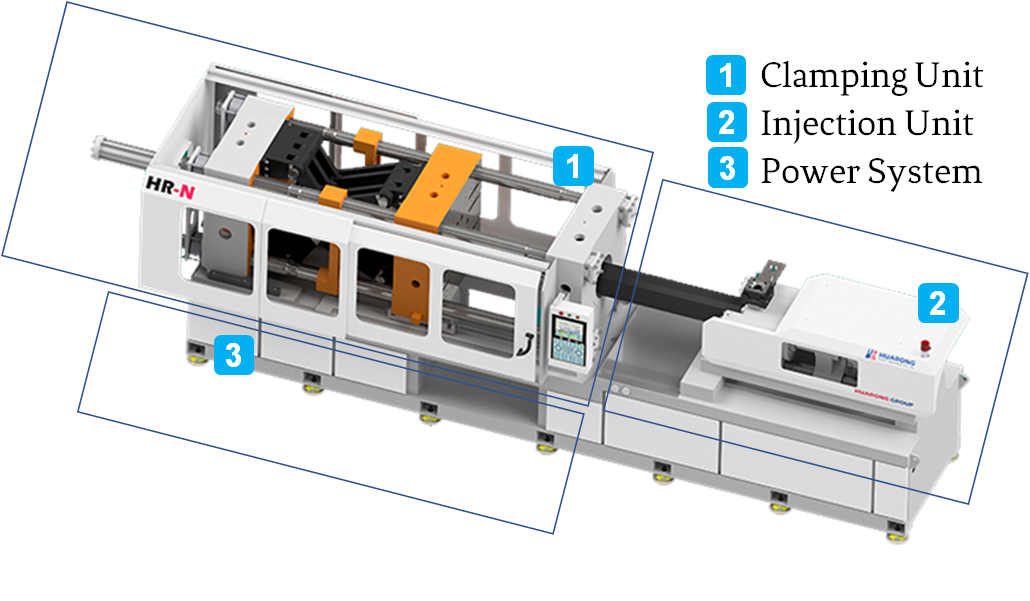
Every case of flash injection molding stems from a competition between clamping force and injection pressure.
The clamping unit generates tonnage to keep mold halves closed. Simultaneously, the injection unit applies high injection pressure to fill the cavity. If the internal plastic pressure surpasses available clamp force, even momentarily, the mold opens microscopically. Molten plastic then seeps into the gap, forming flash.
Even if a gap opens in the mold, whether flash actually forms depends largely on two factors:
- Viscosity of the plastic:Low-viscosity resins—such as nylon (PA), acetal (POM), or TPU—flow much more readily into microscopic gaps than high-viscosity polymers like polycarbonate (PC) or PVC. Materials with lower viscosity are naturally more prone to flash, especially when the mold fit is not perfectly tight.
- Gap thickness:The wider the gap at the parting line or around mold components, the greater the likelihood of flash. Even a gap as small as a few microns can allow low-viscosity melt to escape under high pressure.
In practice, resins such as PA, POM, and TPU require caution due to their high flowability and sensitivity to mold imperfections. Moisture absorption, especially in nylon, can lower viscosity and increase flash risk. In contrast, high-viscosity plastics like PC and PVC are less prone to flash unless mold gaps are large or settings are off.
Understanding why flash develops is the foundation for effective countermeasures.
- Plastic pressure exceeds clamping force, forcing the mold open microscopically.
- Overpacking during holding pressure phases sustains cavity pressure unnecessarily.
- Insufficient clamping pressure fails to secure the mold tightly, creating openings.
- Excessively high injection pressure or speed drives molten resin into gaps.
- Mold is not held together with enough pressure, especially after prolonged use.
- Wear or damage on parting surfaces reduces sealing accuracy.
- Mold misalignment due to worn guide pins or bushings.
- Small gaps develop at the parting line, ejector pin gaps, or slider/lifter shutoff areas.
- Lacking tight tolerances at the parting line or shutoff areas.
- Design does not account for material shrinkage, causing stress concentrations.
- Poor venting plan — vents too shallow to trap air, too deep to allow plastic leakage.
- Geometry issues such as thin walls, sharp corners, or weak shutoff areas near the parting line.
- Low-viscosity plastics more easily flow into microscopic gaps.
- Moisture contamination reduces viscosity and destabilizes flow behavior.
- Improper additive or lubricant ratios lower resistance to flow, increasing flash risk.
Flash prevention requires an integrated approach — addressing process parameters, mold design, material handling, and maintenance simultaneously.
- Increase clamp tonnage to exceed cavity injection pressure, but avoid excessive force that damages tools.
- Reduce injection speed during final filling to limit surges.
- Optimize packing pressure and time to prevent overpacking.
- Lower melt temperature within recommended limits to maintain viscosity.
- Adjust shot size and cushion to avoid overfilling.
- Recut and polish parting lines to restore sealing.
- Increase shutoff land width or add stepped shutoffs.
- Reinforce plates with thicker backplates or support pillars to resist deflection.
- Replace worn ejector pins and sleeves with hardened precision components.
- Machine vents to correct depth for the resin grade; too shallow traps air, too deep causes flash.
- Dry hygroscopic materials thoroughly using desiccant dryers.
- Choose resin grades with a viscosity suited for the application.
- Validate additive packages to prevent destabilized flow.
- Balance runner systems to equalize filling.
- Use fillets and radii instead of sharp corners.
- Reinforce wall thickness near parting lines.
- Place gates to promote balanced flow.
- Use mold flow simulation to identify flash-prone areas before steel is cut.
- Maintain precise alignment with hardened guide pins and bushings.
- Increase land width around cavities for improved sealing.
- Incorporate interlocks or step parting lines for tighter shutoff.
- Reinforce plates with support pillars to minimize deflection.
- Machine venting channels with appropriate depth and width for the resin type.
- Calibrate clamp tonnage to exceed projected cavity pressure.
- Optimize injection speed profiles: fast filling with controlled deceleration near the end.
- Reduce holding pressure while maintaining sufficient packing to prevent sink marks.
- Lower melt and mold temperatures within recommended resin specifications.
- Minimize cushion size and stroke length to prevent overfilling.
- Dry hygroscopic materials thoroughly using desiccant dryers.
- Screen incoming resins for moisture and contamination.
- Use higher viscosity grades when a thin-walled design does not require ultra-flow resins.
- Validate compatibility of additives and masterbatches.
- Inspect and polish parting surfaces regularly.
- Monitor for wear in ejector pins, slides, and bushings.
- Recut or deepen vents if clogged or worn down.
- Schedule clamp calibration checks to confirm accurate tonnage.
Flash injection molding serves as both a defect and a diagnostic indicator. It reflects imbalances among injection pressure, clamping force, material viscosity, and tooling accuracy. Adopting a comprehensive approach — integrating parameter optimization, resilient mold design, careful material management, scientific molding practices, and preventive maintenance — enables manufacturers to maintain stable, flash-free production.
Increasing clamp force helps, but if the mold has worn parting lines, misaligned components, or excessive injection pressure, flash can still occur. Always check the mold condition and balance process parameters.
Inspect where the flash appears — at parting lines, ejector pin holes, vents, or gates. Each location suggests different root causes, such as mold wear, improper vent depth, or excessive injection pressure.
Yes. For hygroscopic materials (e.g., PA), proper drying reduces viscosity fluctuations and helps maintain process stability, which lowers flash risk.
Routine inspection and maintenance are critical — check parting surfaces, ejector pins, and vents after every production run, and schedule more thorough maintenance periodically based on production volume.
We are a trusted injection molding machine manufacturer with over 40 years of experience. Our machines are designed for precision, durability, and smart process control, enabling customers worldwide to achieve defect-free and efficient production.
Explore our product range or contact us for expert advice on optimizing your injection molding process and preventing injection molding defects.
- Group Name: Huarong Group
- Brand: Huarong, Yuhdak, Nanrong
- Service Offerings: Injection Molding Machine, Vertical Injection Molding Machine, Injection Molding Automation
- Tel: +886-6-7956777
- Address: No.21-6, Zhongzhou, Chin An Vil., Xigang Dist., Tainan City 72351, Taiwan
- Official Website: https://www.huarong.com.tw/